At ABACUS2.0 we maintain a short list of standard software available for our users. A few software packages are only available for some research groups.
Users are not limited to using the software installed by us. You are welcome to install your own software either in your home directory or in your project’s /work/project/ folder.
You are also welcome to contact us and we will in many cases help you with the installation. If the software is freely available, we will, in general, add the software to our software “modules”. For more information on modules, see our page specifically on modules.
Many software modules are available in multiple versions. The default version is shown below. To get consistent results, you should always specify the version you want when using module load in your sbatch scripts.
Applications
AMBER is a collection of molecular dynamics simulation programs. Amber is ONLY available to SDU users. To get the currently default version of the amber module, use:
testuser@fe1:~$ module load amber/16-2016.05
An example of sbatch script can be found on the ABACUS2.0 frontend node at the location/opt/sys/documentation/sbatch-scripts/amber/amber-14-2015.05.sh. The contents of this file are shown below.
#! /bin/bash
#
#SBATCH --account test00_gpu      # account
#SBATCH --nodes 1                 # number of nodes
#SBATCH --ntasks-per-node 2       # number of MPI tasks per node
#SBATCH --time 2:00:00            # max time (HH:MM:SS)
#
# Name of the job
#SBATCH --job-name test-1-node
#
# Send email
# Your email address from deic-adm.sdu.dk is used
# Valid types are BEGIN, END, FAIL, REQUEUE, and ALL
#SBATCH --mail-type=ALL
#
# Write stdout/stderr output, %j is replaced with the job number
# use same path name to write everything to one file
# The files are by default placed in directory you call sbatch
#SBATCH --output slurm-%j.txt
#SBATCH --error  slurm-%j.txt

echo Running on "$(hostname)"
echo Available nodes: "$SLURM_NODELIST"
echo Slurm_submit_dir: "$SLURM_SUBMIT_DIR"
echo Start time: "$(date)"

# Load relevant modules
module purge
module add amber/14-2015.05

# Copy all input files to local scratch on all nodes
for f in *.inp *.prmtop *.inpcrd ; do
    sbcast "$f" "$LOCALSCRATCH/$f"
done

cd "$LOCALSCRATCH"

if [ "${CUDA_VISIBLE_DEVICES:-NoDevFiles}" != NoDevFiles ]; then
    # We have access to at least one GPU
    cmd=pmemd.cuda.MPI
else
    # no GPUs available
    cmd=pmemd.MPI
fi

export INPF="$LOCALSCRATCH/input"
export OUPF="$LOCALSCRATCH/input"
srun "$cmd" -O -i em.inp -o "$SLURM_SUBMIT_DIR/em.out" -r em.rst \
     -p test.prmtop -c test.inpcrd -ref test.inpcrd

echo Done.
For further information: http://ambermd.org/
Versions available:
- amber/14-2015.04
- amber/14-2015.05
- amber/16-2016.05 (default)
- amber/16-2017.02
- amber/16-2017.04
COMSOL Multiphysics is a finite element analysis, solver and Simulation Software / FEA Software package for various physics and engineering applications, especially coupled phenomena, or multiphysics. COMSOL is currently only available for a very small set of users. Contact us if you want to use COMSOL to hear about your options. By default, COMSOL creates a lot of small files in your$HOME/.comsolfolder. These files may fill up your home directory, after which COMSOL and other programs are not able to run. The easiest way to fix this is to use /tmp for all COMSOL related temporary files (with the side effect that COMSOL settings are not saved between consecutive COMSOL runs).
rm -rf ~/.comsol
ln -s /tmp ~/.comsol
To get the currently default version of the comsol module, use:
testuser@fe1:~$ module load comsol/5.2
An example of sbatch script can be found on the ABACUS2.0 frontend node at the location/opt/sys/documentation/sbatch-scripts/comsol/comsol-5.1.sh. The contents of this file are shown below.
#! /bin/bash
#
#SBATCH --nodes 1                 # number of nodes
#SBATCH --ntasks-per-node 1       # number of MPI tasks per node
#SBATCH --time 2:00:00            # max time (HH:MM:SS)

echo Running on "$(hostname)"
echo Available nodes: "$SLURM_NODELIST"
echo Slurm_submit_dir: "$SLURM_SUBMIT_DIR"
echo Start time: "$(date)"

# Load relevant modules
module purge
module add comsol/5.1

IN_MPH=GSPmetasurface2D.mph
OUT_MPH=out.mph

comsol -clustersimple batch -inputfile $IN_MPH -outputfile $OUT_MPH

echo Done.
For further information: http://www.comsol.com/comsol-multiphysics
Versions available:
- comsol/5.1
- comsol/5.2a
- comsol/5.2 (default)
- comsol/5.3
Gaussian 09 provides state-of-the-art capabilities for electronic structure modeling. Gaussian sbatch job scripts can be generated and submitted using the commandsubg09 test.com. Usesubg09 -p test.comto see the generated script without submitting it. This module is only available to some SDU users. Contact support@escience.sdu.dk for more information.
To get the currently default version of the gaussian09 module, use:
testuser@fe1:~$ module load gaussian09/D.01
An example of sbatch script can be found on the ABACUS2.0 frontend node at the location/opt/sys/documentation/sbatch-scripts/gaussian09/gaussian09-D.01.sh. The contents of this file are shown below.
#! /bin/bash
#
# Gaussian job script
#
#
#SBATCH --nodes 1
#SBATCH --job-name test
#SBATCH --time 10:00:00

# Setup environment
module purge
module add gaussian09/D.01

# Run Gaussian
g09 < test.com >& test.log

# Copy chk file back to workdir
test -r $GAUSS_SCRDIR/test.chk && cp -u $GAUSS_SCRDIR/test.chk .
For further information: http://www.gaussian.com/g_prod/g09.htm
Versions available:
- gaussian09/D.01 (default)
GaussView is a GUI for Gaussian 09. This module is only available to some SDU users. Contact support@escience.sdu.dk for more information. To get the currently default version of the gaussview module, use:
testuser@fe1:~$ module load gaussview/5.0.8
For further information: http://www.gaussian.com/g_prod/gv5.htm
Versions available:
- gaussview/5.0.8 (default)
GROMACS is a collection of molecular dynamics simulation programs. To get the currently default version of the gromacs module, use:
testuser@fe1:~$ module load gromacs/5.1.2
An example of sbatch script can be found on the ABACUS2.0 frontend node at the location/opt/sys/documentation/sbatch-scripts/gromacs/gromacs-5.1.2.sh. The contents of this file are shown below.
#! /bin/bash
#SBATCH --account sdutest00_gpu
#SBATCH --nodes 8
#SBATCH --time 24:00:00
#SBATCH --mail-type=ALL
#
# MPI ranks per node:
# * GPU nodes.....: one rank per GPU card, i.e., 2
# * Slim/fat nodes: one rank per CPU core, i.e., 24
#SBATCH --ntasks-per-node 2

echo Running on $(hostname)
echo Available nodes: $SLURM_NODELIST
echo Slurm_submit_dir: $SLURM_SUBMIT_DIR
echo Start time: $(date)

module purge
module add gromacs/5.1.2

if [ "${CUDA_VISIBLE_DEVICES:-NoDevFiles}" != NoDevFiles ]; then
    cmd="gmx_gpu_mpi mdrun"
else
    cmd="gmx_mpi mdrun"
fi

# Cores per MPI rank
OMP=$(( 24 / $SLURM_NTASKS_PER_NODE ))

# prod is the name of the input file
srun $cmd -pin on -ntomp $OMP -notunepme -deffnm prod -cpi prod.cpt -append
For further information: http://www.gromacs.org/
Versions available:
- gromacs/4.5.7
- gromacs/4.5.7-p2.3.2
- gromacs/4.6.7
- gromacs/5.0.4-openmpi
- gromacs/5.0.4
- gromacs/5.0.5
- gromacs/5.0.6
- gromacs/5.1 (default)
- gromacs/5.1.2 (default)
- gromacs/5.1.4
- gromacs/5.1.4-p2.3.2
- gromacs/2016.2
- gromacs/2016.3
- gromacs/2016.3-p2.3.2
- gromacs/2016.4
- gromacs/2016.4-dp
- gromacs/2018.2
MATLAB (MATrix LABoratory) is a numerical computing environment developed by MathWorks. Matlab allows matrix manipulations, plotting of functions and data and implementation of algorithms. Note that the matlab file, e.g.,test.mmust includeexitas the line to ensure that Matlab exits correctly. MATLAB is currently available for most of our academic users. For further information, see the web page on ourMATLAB Hosting Provider Agreement.
For using MATLAB together with a MATLAB GUI running on your own computer/laptop, you may want to look at our MATLAB documentation page. The page also contains further information relevant for any MATLAB user at ABACUS2.0.
To get the currently default version of the matlab module, use:
testuser@fe1:~$ module load matlab/R2016a
An example of sbatch script can be found on the ABACUS2.0 frontend node at the location/opt/sys/documentation/sbatch-scripts/matlab/matlab-R2016a.sh. The contents of this file are shown below.
#! /bin/bash
#
#SBATCH --nodes 1                 # number of nodes
#SBATCH --time 2:00:00            # max time (HH:MM:SS)

echo Running on "$(hostname)"
echo Available nodes: "$SLURM_NODELIST"
echo Slurm_submit_dir: "$SLURM_SUBMIT_DIR"
echo Start time: "$(date)"

# Load relevant modules
module purge
module add matlab/R2016a

# Run the MATLAB code available in matlab_code.m
# (note the missing .m)
matlab -nodisplay -r matlab_code

echo Done.
For further information: http://se.mathworks.com/products/matlab/
Versions available:
- matlab/R2015a
- matlab/R2015b
- matlab/R2016a (default)
- matlab/R2016b
- matlab/R2017a
- matlab/R2017b
- matlab/R2018a
NAMD is a scalable parallel molecular dynamics package. To get the currently default version of the namd module, use:
testuser@fe1:~$ module load namd/2.10
An example of sbatch script can be found on the ABACUS2.0 frontend node at the location/opt/sys/documentation/sbatch-scripts/namd/namd-2.10.sh. The contents of this file are shown below.
#!/bin/bash
#
#SBATCH --account         sysops_gpu
#SBATCH --time            00:10:00
#SBATCH --nodes           4
#SBATCH --ntasks-per-node 1
#SBATCH --mail-type       FAIL

# Also see
# http://www.ks.uiuc.edu/Research/namd/wiki/index.cgi?NamdOnSLURM

# Specify input file at submission using
#    sbatch namd-test.sh /path/to/input.namd
# Default value is apoa1/apoa1.namd
INPUT=${1-apoa1/apoa1.namd}

echo Running on "$(hostname)"
echo Available nodes: "$SLURM_NODELIST"
echo Slurm_submit_dir: "$SLURM_SUBMIT_DIR"
echo Start time: "$(date)"
echo

module purge
module add namd

#
# Find version of namd command to use
#
cmd=namd2

# Should we use the MPI version?
if [ "$SLURM_NNODES" -gt 1 ]; then
    cmd="$cmd-mpi"
fi

# Should we use the CUDA version
if [ "${CUDA_VISIBLE_DEVICES:-NoDevFiles}" != NoDevFiles ]; then
    cmd="$cmd-cuda"
fi

if [ "$SLURM_NNODES" -gt 1 ]; then
    # Worker threads per MPI rank
    WT=$(( 24 / $SLURM_NTASKS_PER_NODE - 1 ))
    echo srun "$cmd" ++ppn "$WT" "$INPUT"
    srun      "$cmd" ++ppn "$WT" "$INPUT"
else
    # running on a single node
    charmrun ++local +p12 "$(which "$cmd")" "$INPUT"
fi
For further information: http://www.ks.uiuc.edu/Research/namd/
Versions available:
- namd/2.10 (default)
NetLogo is a multi-agent programmable modeling environment. To get the currently default version of the netlogo module, use:
testuser@fe1:~$ module load netlogo/5.2.0
For further information: https://ccl.northwestern.edu/netlogo/
Versions available:
- netlogo/5.2.0 (default)
Agisoft PhotoScan is a stand-alone software product that performs photogrammetric processing of digital images and generates 3D spatial data to be used in GIS applications, cultural heritage documentation and visual effects production as well as for indirect measurements of objects of various scales. This module is only available to some users. Contact support@escience.sdu.dk for further information. To get the currently default version of the photoscan module, use:
testuser@fe1:~$ module load photoscan/1.2.4
For further information: http://www.agisoft.com/
Versions available:
- photoscan/1.1.6
- photoscan/1.2.4 (default)
A lot of research projects use Python and different Python packages/modules to achieve results. This page describes how to easily setup a workable python environment with your own python packages inside. For new projects, you should in particular consider whether you want to use the 2.x or 3.x variant of Python. The two versions are not compatible and in some cases, you may have to use an older 2.7.x versions of Python due to some of your packages not working with Python 3.x.
Python distributions
At ABACUS2.0 we maintain two variants of Python and several versions of each:
- python/2.7.9
- python/2.7.10
- python/2.7.11 (default)
- python/2.7.12
- python/2.7.13
- python/3.4.3
- python/3.5.1
- python/3.5.2
- python/3.6.0
- python/3.6.3
- python-intel/2.7.10-184913
- python-intel/2.7.11 (default)
- python-intel/2.7.12
- python-intel/2.7.12.35
- python-intel/2.7.14
- python-intel/3.5.0-185146
- python-intel/3.5.1
- python-intel/3.5.2
- python-intel/3.5.2.35
- python-intel/3.6.3
The vanilla Python versions (python) includes Python and a few extra packages including in particularvirtualenv(see below). For further information, have a look at the official Python home page
The Intel optimized version of Python (python-intel) has been compiled by Intel and includes a lot of widely used python packages including numpy,scipy,pandas,matplotlib,virtualenv, etc. for more information look at the official Intel Python home page:
To use a particular version of python simply use module add:
testuser@fe1:~$ module add python-intel/3.5.2.35
Adding extra packages
In many cases you will need extra python packages for your project. In the following we describe two ways to do this. You should consider both of them and use the one most suitable for your project.
As noted above, also consider using one of the python-intelvariants as this already contains many packages, including in particular some of the packages you may need.
Adding extra packages #1 – using pip --user
In the simple case, you only need one/a few packages and only need this for yourself. In this case, use pip install --user to install the module your own home directory as shown below i.e., first use module add to select the right python version, next use pip install
testuser@fe1:~$ module add python-intel/3.5.2.35
testuser@fe1:~$ pip install --user Pillow
Collecting Pillow
  Downloading Pillow-4.1.0-cp35-cp35m-manylinux1_x86_64.whl (5.7MB)
    100% |████████████████████████████████| 5.7MB 204kB/s
Collecting olefile (from Pillow)
  Downloading olefile-0.44.zip (74kB)
    100% |████████████████████████████████| 81kB 8.6MB/s
Building wheels for collected packages: olefile
  Running setup.py bdist_wheel for olefile ... done
  Stored in directory: /home/testuser/.cache/pip/wheels/20/...
Successfully built olefile
Installing collected packages: olefile, Pillow
Successfully installed Pillow-4.1.0 olefile-0.44
Files are installed in your home directory (in~/.local/).
Things to consider:
- The packages are only available to your own user, not to anybody else.
- If you change the Python version selected with
module add, the module may not work, and you may have to redo this.
Adding extra packages #2 – usingvirtualenv
virtualenvis a tool that can be used to create isolated Python environments. In each environment you select the Python version and Python packages needed for you project. If you keep old virtualenv environments, it is possible to later redo some of the job scripts in the exact same Python environment as when you ran the script the first time.
Creating the environment
The Python files need to be placed in a directory. In the following examples we use/work/sdutest/tensorto install our own version ofTensorflow. You should instead use a directory within one of your own project directories.
testuser@fe1:~$ module purge
testuser@fe1:~$ # tensorflow also requires the CUDA and cudnn modules
testuser@fe1:~$ module add python/3.5.2 cuda/8.0.44 cudnn/5.1
testuser@fe1:~$ virtualenv /work/sdutest/tensor-1.2
PYTHONHOME is set.  You *must* activate the virtualenv before using it
Using base prefix '/opt/sys/apps/python/3.5.2'
New python executable in /work/sdutest/tensor-1.2/bin/python3.5
Also creating executable in /work/sdutest/tensor-1.2/bin/python
Installing setuptools, pip, wheel...done.
testuser@fe1:~$ source /work/sdutest/tensor-1.2/bin/activate
(tensor-1.2) testuser@fe1:~$ # you are now inside your own Python environment
Note the line withsource /work/sdutest/tensor-1.2/bin/activate. You’ll need to repeat this step every time before you actually use your new Python environment.
We suggest to edit theactivatescript to include themodule purgeandmodule addlines from above to easily setup the correct environment every time you use this. The two linesmustbe added to the top of the file.
testuser@fe1:~$ nano /work/sdutest/tensor-1.2/bin/activate
# add module purge and module add ... lines at the top
Adding packages
After the initial package setup, you can usepip installas you would if you had installed Python yourself, e.g.,
testuser@fe1:~$ source /work/sdutest/tensor-1.2/bin/activate
(tensor-1.2) testuser@fe1:~$ which pip
/work/sdutest/tensor-1.2/bin/pip
(tensor-1.2) testuser@fe1:~$ pip3 install --upgrade tensorflow-gpu
Collecting tensorflow-gpu
  Downloading tensorflow_gpu-1.1.0-cp35-cp35m-manylinux1_x86_64.whl (84.1MB)
    100% |████████████████████████████████| 84.1MB 18kB/s
Collecting protobuf>=3.2.0 (from tensorflow-gpu)
...
Installing collected packages: protobuf, numpy, werkzeug, tensorflow-gpu
Successfully installed numpy-1.12.1 protobuf-3.3.0 tensorflow-gpu-1.1.0 werkzeug-0.12.2
(tensor-1.2) testuser@fe1:~$
Using the environment
If you added themodule purgeandmodule add ...lines as described in the first step, you simply need tosourcetheactivatescript everytime before starting to use the Python environment.
testuser@fe1:~$ source /work/sdutest/tensor-1.2/bin/activate
(tensor-1.2) testuser@fe1:~$ # you are now inside your own Python environment
Similarly, in your Slurm job scripts you should add thesourceline as shown below:
#! /bin/bash
#SBATCH --account sdutest_gpu     # account
#SBATCH --time 2:00:00            # max time (HH:MM:SS)

echo Running on "$(hostname)"
echo Available nodes: "$SLURM_NODELIST"
echo Slurm_submit_dir: "$SLURM_SUBMIT_DIR"
echo Start time: "$(date)"

# Load the Python environment
source /work/sdutest/tensor-1.2/bin/activate

# Start your python application
python ...

echo Done.
R is a programming language and software environment for statistical computing and graphics. The R language is widely used among statisticians and data miners for developing statistical software and data analysis.To get the currently default version of the R module, use
testuser@fe1:~$ module load R/3.2.5
An example sbatch script can be found on the ABACUS 2.0 frontend node at the location/opt/sys/documentation/sbatch-scripts/R/R-3.2.2.sh. The contents of this file is shown below.
#! /bin/bash
#SBATCH --account test00_gpu
#SBATCH --nodes 1
#SBATCH --time 1:00:00

echo Running on "$(hostname)"
echo Available nodes: "$SLURM_NODELIST"
echo Slurm_submit_dir: "$SLURM_SUBMIT_DIR"
echo Start time: "$(date)"

module purge
module add R/3.2.2

R --vanilla < Fibonacci.R
Further information: http://www.r-project.org/
Versions available:
- R/3.2.2
- R/3.2.5 (default)
- R/3.3.1
- R/3.3.2
- R/3.5.0
- R/3.5.1
An integrated development environment for R, RStudio Desktop, is available as module file:
testuser@fe1:~$ module load rstudio/1.1.456The software only works in an interactive session, using X or VNC.
Julia is a high-level modern open-source programming language for scientific, mathematical and numeric computing. Julia provides the functionality, ease-of-use and intuitive syntax of R, Python, and Matlab combined with the speed, capacity and performance of Fortran and C/C++. Furthermore, Julia provides multithreading, parallel, distributed and supercomputing capabilities as well as arbitrarily large scalability.
Available distributions
- julia/0.6.4
- julia/1.0.2 (default)
To use a particular version of Julia simply use module add and run the command julia to open the Julia REPL:
testuser@fe1:~$ module add julia/1.0.2testuser@fe1:~$ julia _ _ _ _(_)_ | Documentation: https://docs.julialang.org (_) | (_) (_) | _ _ _| |_ __ _ | Type "?" for help, "]?" for Pkg help. | | | | | | |/ _` | | | | |_| | | | (_| | | Version 1.0.2 (2018-11-08) _/ |\__'_|_|_|\__'_| | Official https://julialang.org/ release |__/ | julia>
Julia provides a built-in package manager, Pkg, for installing additional packages that are written in Julia. Version and dependency management is handled automatically by Pkg. The default installation directory of a Julia package is in the folder $HOME/.julia/. A new installation folder can be defined by exporting the corresponding environmental variables:
testuser@fe1:~$ # for Julia-v0.6testuser@fe1:~$ module load julia/0.6.4; export JULIA_PKGDIR=/work/sysops/julia_package_dir/testuser@fe1:~$ # for Julia-v1.0testuser@fe1:~$ module load julia/1.0.2; export JULIA_DEPOT_PATH=/work/sysops/julia_package_dir/
It is convenient to define the Julia working directory in the /work/project folder instead of the user $HOME directory, because of its limited storage capability.
Further information: https://julialang.org/
Stata is a general-purpose statistical software package created by StataCorp.This module is currently only available to SDU users. Contact support@escience.sdu.dk for more information.To get the currently default version of the stata module, use
testuser@fe1:~$ module load stata/14.0
An example sbatch script can be found on the ABACUS 2.0 frontend node at the location/opt/sys/documentation/sbatch-scripts/stata/stata-14.0.sh. The contents of this file is shown below.
#! /bin/bash
#
#SBATCH --nodes 1                 # number of nodes
#SBATCH --ntasks-per-node 1       # number of MPI tasks per node
#SBATCH --time 2:00:00            # max time (HH:MM:SS)

echo Running on "$(hostname)"
echo Available nodes: "$SLURM_NODELIST"
echo Slurm_submit_dir: "$SLURM_SUBMIT_DIR"
echo Start time: "$(date)"

# Load relevant modules
module purge
module add stata/14.0

# stata output is put in example.log
stata -b example.do

echo Done.
Further information: https://www.stata.com/
Versions available:
- stata/14.0 (default)
VMD is a molecular visualization program for displaying, animating, and analyzing large biomolecular systems using 3-D graphics and built-in scripting.To get the currently default version of the vmd module, use
testuser@fe1:~$ module load vmd/1.9.3
An example sbatch script can be found on the ABACUS 2.0 frontend node at the location/opt/sys/documentation/sbatch-scripts/vmd/vmd-1.9.3.sh. The contents of this file is shown below.
#! /bin/bash
#
# VMD job script
#
#SBATCH --nodes 1
#SBATCH --job-name test
#SBATCH --time 1:00:00

echo Running on "$(hostname)"
echo Available nodes: "$SLURM_NODELIST"
echo Slurm_submit_dir: "$SLURM_SUBMIT_DIR"
echo Start time: "$(date)"
echo

# Setup environment
module purge
module add vmd/1.9.3

# Run VMD
vmd -eofexit < test.tcl

# If the TCL script takes arguments, use instead:
#   vmd -e test.tcl -args <arg1> <arg2> ...
# and be sure to place an exit statement at the end
# of the script.

echo End time: "$(date)"
Further information: http://www.ks.uiuc.edu/Research/vmd/
Versions available:
- vmd/1.9.3 (default)
Jupyter is an open-source web application that allows you to create and share documents that contain live code, equations, visualizations and narrative text. Because Jupyter is a web application, we provide an easy-to-use tool that automatically launches Jupyter jobs on ABACUS 2.0, while forwarding the web interface to the user’s local browser. The program supports both Jupyter Notebook and JupyterLab, with Python and R kernels
Download
The Python program can be downloaded here: MacOS/Linux or Windows
If a newer version exists, the program will automatically update when connecting to ABACUS 2.0.
Requirements
The program has been tested on macOS, Linux, and Windows. The requirements for running the program are listed below.
- Python 2.7 or newer
- Tkinter python package
- OpenSSH for macOS and Linux
- PuTTY for Windows
Usage
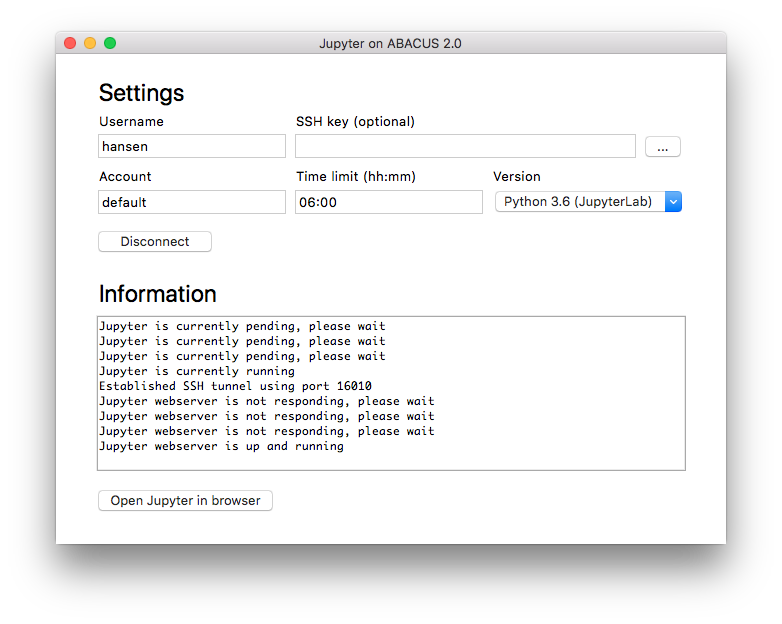
From the main window of the program, the user can specify the following settings.
- Username: Username used to connect to the ABACUS 2.0 supercomputer
- SSH Key: This should only be used if the private SSH key is stored in a non-default location
- Account: Slurm account used for running the job
- Time limit: Slurm wall-time limit for the job
- Version: Python and Jupyter version used for running the job
In most cases, only the username is mandatory, while the remaining settings can be left with their default value. After pressing the connect button, the program tries to connect to the ABACUS 2.0 supercomputer, with status messages written in the text field below. If the connection is successful, the program submits a new job to the queue system and waits until the job starts running. Please note that the extent of this waiting period depends on the number of available nodes in the chosen slurm queue. After the job starts running, the user can press the “Open Jupyter in browser” button, after which the user can start working through the Jupyter webinterface. When closing the program or pressing the disconnect button, the Jupyter job is automatically stopped on the ABACUS 2.0 supercomputer. For this reason, the program must be running while using Jupyter in the browser.
Technical details
Depending on the chosen version of Python, on the ABACUS 2.0 supercomputer one of the following two modules are loaded.
- python/2.7.14
- python/3.6.3
If the user requires additional Python packages, the correct module should be loaded, after which the packages can be installed using pip. For example, if the user uses Python 3.6 and needs numpy, use SSH to access the ABACUS 2.0 supercomputer and run the following two commands.
module load python/3.6.3
pip install --user numpy
For the advanced users, it is possible to e.g. load additional modules and set environmental variables before Jupyter starts running. If the file “~/.jupyter/modules” exists, this file is source’d into the submit script before starting Jupyter. For example, if the user needs tensorflow, run the following command:
echo "module load tensorflow/1.14" > ~/.jupyter/modules
It is possible to install additional kernels inside Jupyter Notebook and Jupyter Lab. This is useful if the user needs to run notebooks other than Python, such as R or Julia, but it also provides a way to load multiple Python interpreters from different environments. For example, the user can create a new Python environment with the commands:
module load python/3.6.3
python -m venv my_env
In the new environment my_env the user can install all the relevant modules, e.g.
source ./my_env/bin/activate
pip install --upgrade pip
pip install pandas
Then, my_env can be added to Jupyter following the steps below:
source ./my_env/bin/activate
pip install jupyter
python -m ipykernel install --user --name python3-my_env --display-name "Python 3 (my_env)"
The new IPython kernel is installed in:
~/.local/share/jupyter/kernels/python3-my_env/